There’s something about camping that feels different when you add a little boho magic. A single tapestry can change the whole vibe of a space.
Suddenly, a plain tent turns into a colorful retreat, a hammock feels like an art piece, and even a patch of dirt looks like a cozy outdoor lounge.
For free spirits like me, tapestries are lightweight, packable, and honestly one of the easiest ways to create that dreamy Pinterest-worthy camping aesthetic.
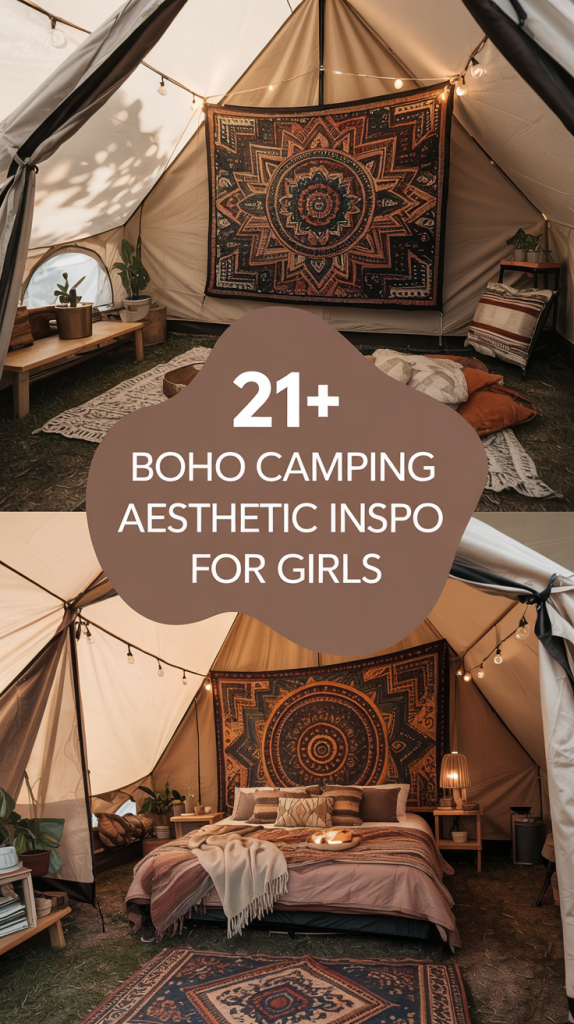
Here are 21 ideas for using boho tapestries at your campsite. Some are practical, some are purely for fun, but all of them bring beauty to your outdoor adventures.
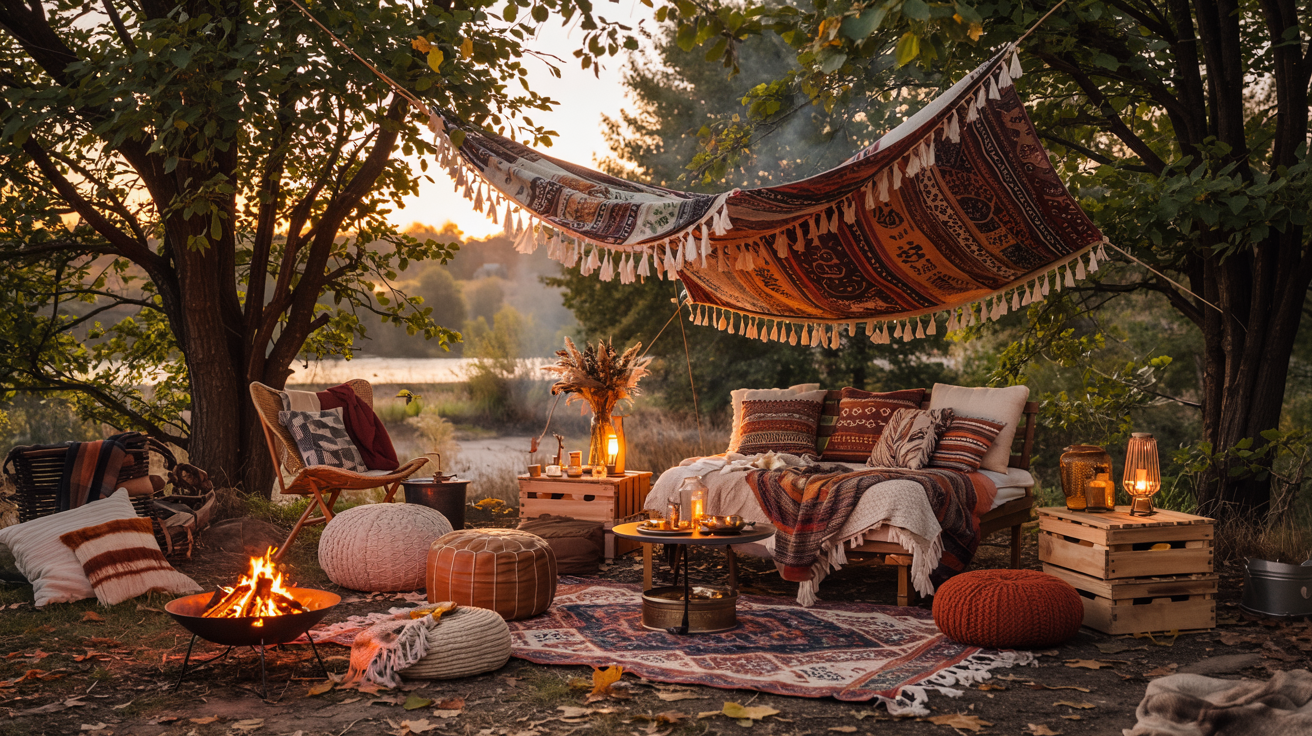
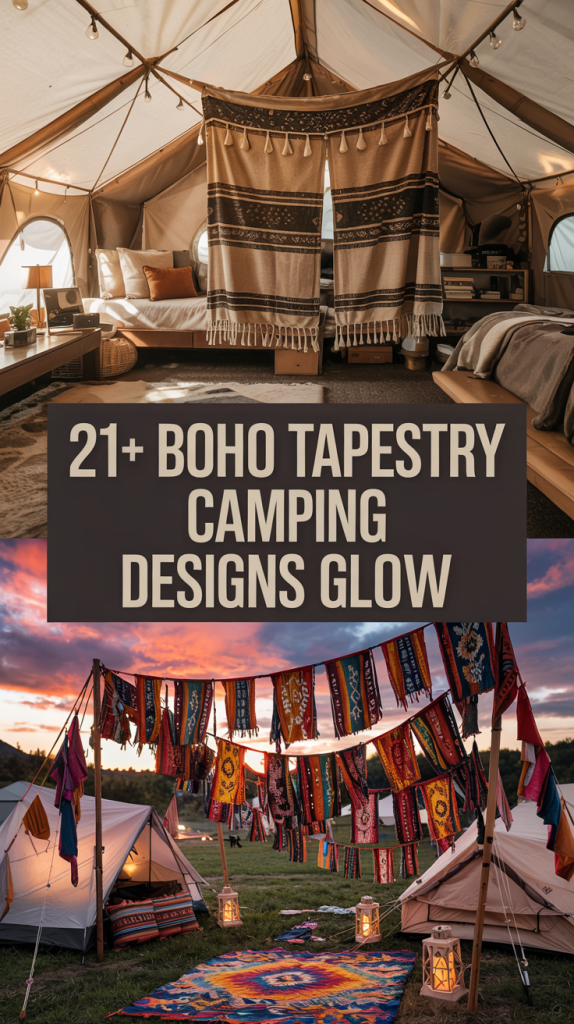
Create a Dreamy Canopy With Boho Tapestries

One of the most magical ways to use a tapestry at your campsite is to turn it into a canopy. You don’t need much to make this work, just a strong piece of fabric, some ropes, and a few solid tie-off points.
Suddenly, you’ve got shade during the day and an intimate little retreat when the stars come out. It feels like the type of spot you’d see in a festival moodboard, and the best part is how quick it is to set up.
RELATED: 21 Maximalist Camping Aesthetic Ideas With Bold Patterns!
RELATED: Ultimate Glamping Bucket List: 10 Unique Ways to Camp in Style!
Using Light, Airy Fabrics for Summer Vibes
If you’re camping in summer, heavy fabrics trap heat and can feel stifling. Lightweight cotton or sheer tapestries let air move through and create a soft dappled light.
It’s perfect for that lazy afternoon nap where you want shade but you still want to see the sky peeking in. Bonus, these fabrics also pack smaller, so you save space in your gear bag.
RELATED: 21+ Boho RV Storage Ideas to Match Your Travel Vibes!
Layering Multiple Tapestries Over Tent Frames

Instead of sticking to one tapestry, try layering two or three for extra depth. If the colors compliment each other, the effect is artistic without being overwhelming.
For example, pair a soft beige base with a brighter mandala print overtop, then let the corners hang loose for a flowy look. I made the mistake once of mixing too many clashing prints and it just looked messy, so trust me on keeping the palette simple.
Anchoring Safely With Poles and Ropes
The one thing people forget is safety. A canopy is no fun if it sags down or worse, blows into the campfire. Use sturdy poles, tent stakes, or nearby trees to tie off each corner.
Carabiners are a game changer here, they make it easy to clip fabric tight and adjust later. Keep your canopy a safe distance from the fire pit, and check knots before bed because winds at night can loosen ropes without you noticing.
RELATED: 20 Cozy Van Life Hacks for Women Traveling Solo!
Transform Tent Walls Into Boho Art
Plain tent walls don’t exactly inspire creativity, but the right tapestry can turn them into a canvas.
It’s one of the simplest tricks I’ve used when I want my campsite to feel less like “just a tent” and more like a cozy little boho den. A single fabric panel instantly changes the mood inside and outside, and it’s way easier than hauling heavy decor.
Attaching Tapestries to the Inside of Canvas Tents
The trick here is to hang the fabric securely without damaging your tent. Some easy options include:
-
Clips or clothespins – quick, removable, and don’t leave marks.
-
Command hooks or Velcro strips – best for canvas walls, they hold weight and peel off clean.
-
Light rope or cord – run it across the top frame of the tent and drape the tapestry over it.
Pro tip: Don’t pin directly into nylon walls, it weakens the fabric and can tear.
RELATED: Glam Camper Curtain Ideas for Women Who Love Sparkle!
Mixing Patterns Without Overcrowding the Space
It’s tempting to go wild with prints, but too many bold designs in a small tent can feel claustrophobic. Instead:
-
Choose one statement tapestry for a focal wall.
-
Pair it with neutral or solid-colored blankets on other walls.
-
Stick to a cohesive color palette (like warm earth tones, or cool blues/greens).
I tried putting mandalas on every wall once and honestly, it felt more like a kaleidoscope than a relaxing retreat. Keeping one wall bold makes the space feel intentional, while the rest stays calming and breathable.
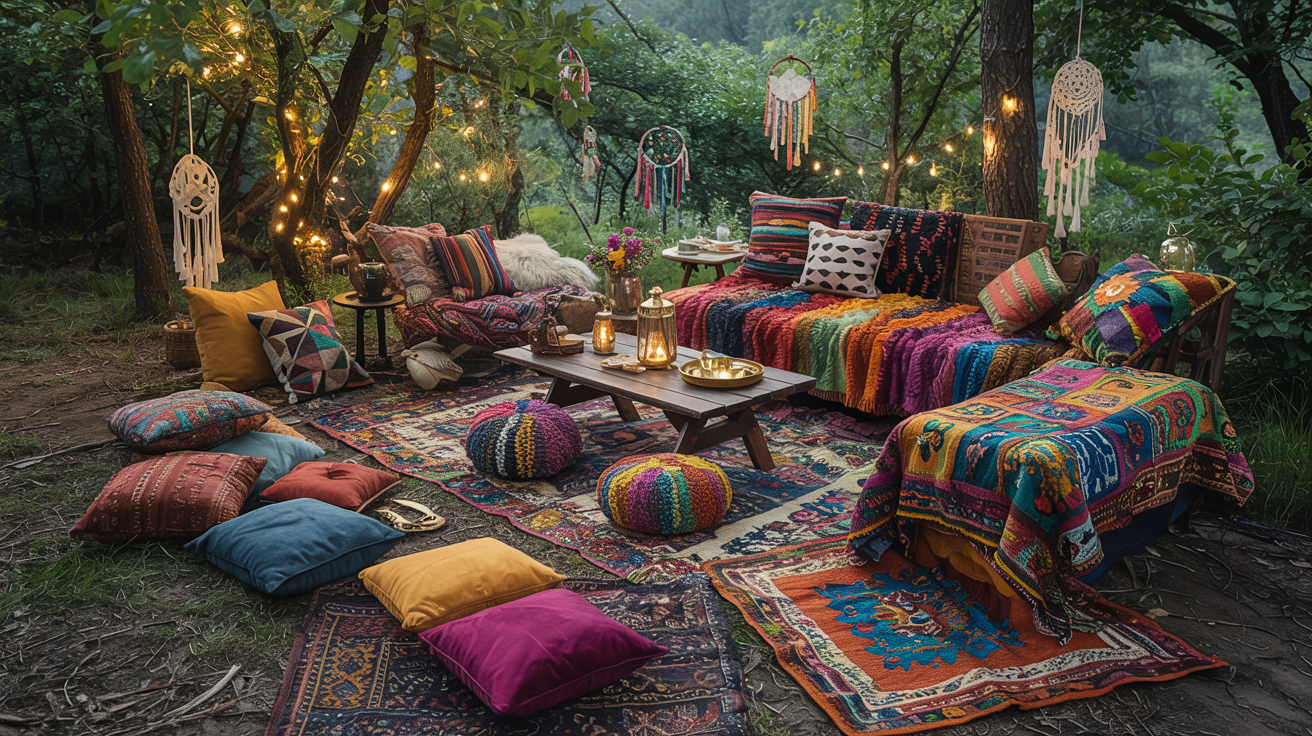
Define Your Fireside Lounge

A good fireside lounge feels intentional, not accidental. Think of your tapestry as the “area rug” that anchors the scene, then build comfort and light around it. When you get the base right, everything else, chairs, poufs, mugs of cocoa, just falls into place.
Draping Tapestries as Ground Blankets
Soften dirt or scratchy grass and give the space a cozy, photo ready footprint. Here’s a simple, practical stack that holds up outside:
RELATED: 23+ Bohemian Camper Ideas for Moms Who Love Color and Texture!
-
Start with a durable surface, clear sticks and sharp stones, then set your lounge on durable ground like packed soil or a pre-impacted site so you’re kind to the landscape, see Leave No Trace on camping surfaces.
- Lay a waterproof barrier, a picnic blanket with a water resistant backing works great, it protects your tapestry from moisture and dew, a solid pick is in Wirecutter’s guide to the best picnic blankets.
- Add your tapestry on top for color and texture, pull it taut so cups don’t tip.
- Anchor corners with small stakes, sandbags, or filled stuff sacks, if it’s breezy, loop cord through corner grommets or sew tiny loops.
- Mind the fire, keep fabric at a safe distance from sparks and place a stepping stone “path” so folks dont track ash onto the weave.
- Shake and pack before bed, roll the tapestry inside the dry layer so dirt stays contained.
Pro tip: If morning dew is heavy, flip the stack, waterproof layer on top while you make breakfast, it keeps your seating dry until the sun warms things up.

Pairing With Poufs, Rugs, and Lanterns
Mixing textures is what makes the lounge feel intentional and cozy, and it photographs beautifully. Aim for three textures minimum:
-
Soft + flat + natural
-
Soft: knit or tufted poufs for feet and overflow seating.
-
Flat: a thin kilim or flatweave runner to define a “coffee table” zone.
-
Natural: wood crates or stump stools as side tables.
-
-
Keep a simple palette, two main colors and one accent, for example, sand and rust with a little sage, it keeps the scene calm when patterns are busy.
-
Layer throws on seating, one wool blanket per chair looks welcoming and keeps the composition balanced in photos.
-
Light at two heights, ground-level glow plus eye-level glow reads warm on camera and in real life, try a lantern on a crate and another hanging from a branch.
-
Hide the clutter, stash extra wood, blankets, and cables inside a crate, top it with a tray so it doubles as a table.
Photo cue: Angle lanterns slightly off center, and pull one pouf into the foreground, that little bit of depth tricks the eye and makes the scene feel immersive.
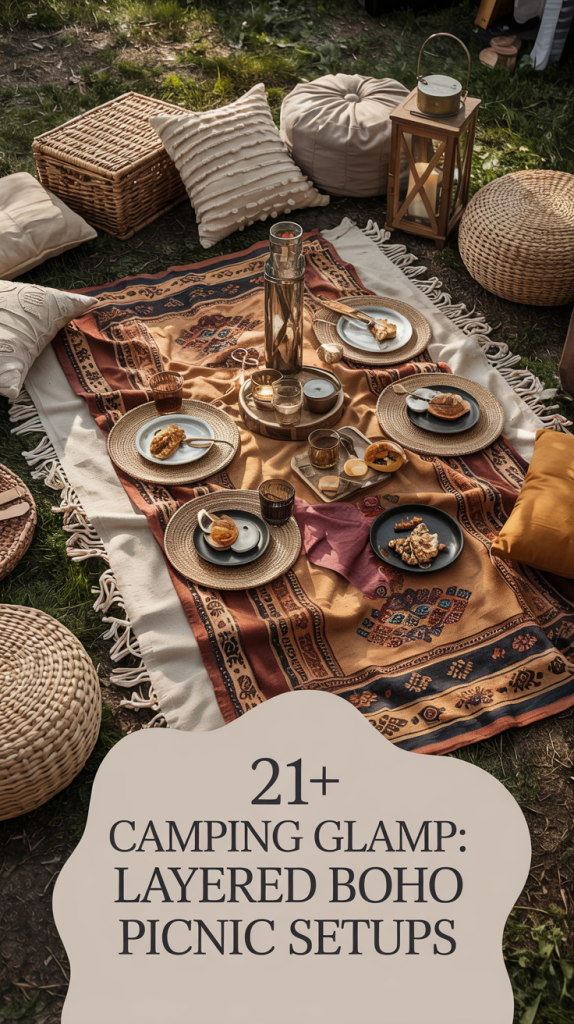
Layered Boho Picnic Setups
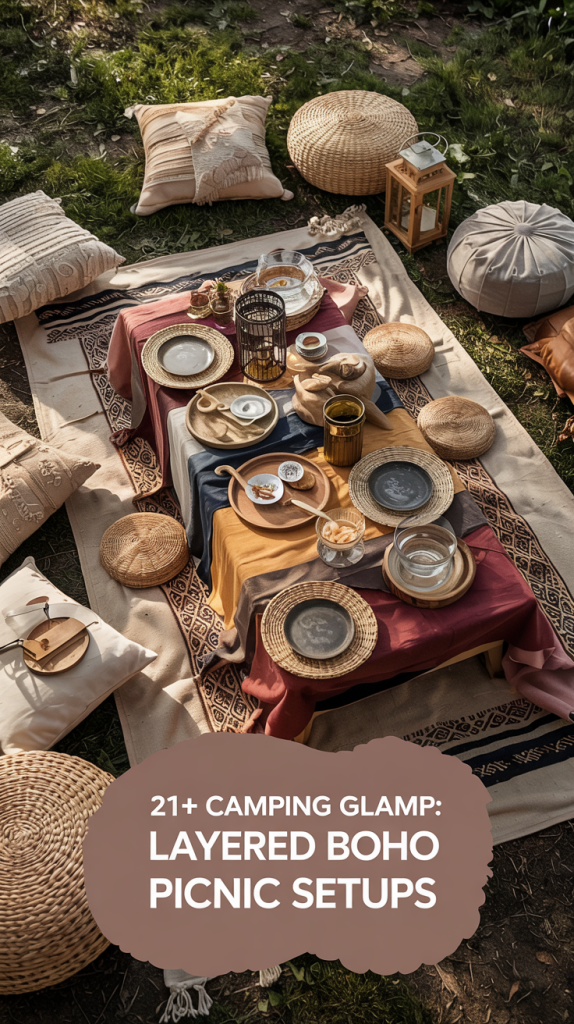
There’s something about a picnic that feels better when it’s styled with intention. A tapestry can take the place of the usual plastic tablecloth or scratchy blanket and make your whole spread look like a magazine shot.
Adding Floor Cushions for Cozy Aesthetic
Low seating instantly creates a more relaxed and nomadic feel.
-
Toss down oversized floor pillows or poufs so everyone sits at the same height.
-
Keep colors consistent with your tapestry — neutrals for calm, jewel tones for bold.
-
Add a small crate or flat woven tray for food, that way drinks dont tip on uneven grass.
It’s the difference between eating lunch and hosting an outdoor gathering you’ll actually want to photograph.
Tapestries as Picnic Tablecloth Alternatives
Instead of a vinyl cover, drape a tapestry across a picnic table or spread it right on the grass.
-
Choose washable fabrics — cotton or blends you can toss in the laundry after a messy meal.
-
Let the edges drape for that soft, casual boho vibe.
-
Layer over waterproof mats if the ground is damp, it keeps food and people dry.
-
Pick earthy colors if you’re eating outdoors, they hide stains better.
Backdrop for Instagram-Worthy Photos

Sometimes the tapestry isn’t just for sitting on, it’s for styling your memories. A patterned backdrop changes your camping photos from “nice” to “save-worthy.”
Choosing Color Palettes That Pop on Camera
Certain colors always photograph better outdoors:
-
Warm oranges and yellows glow during golden hour.
-
Deep blues contrast beautifully with green trees.
-
Warm neutrals (sand, beige, tan) make skin tones look great.
Outdoor photo pros like National Geographic recommend shooting in soft evening light, it helps colors stand out naturally.
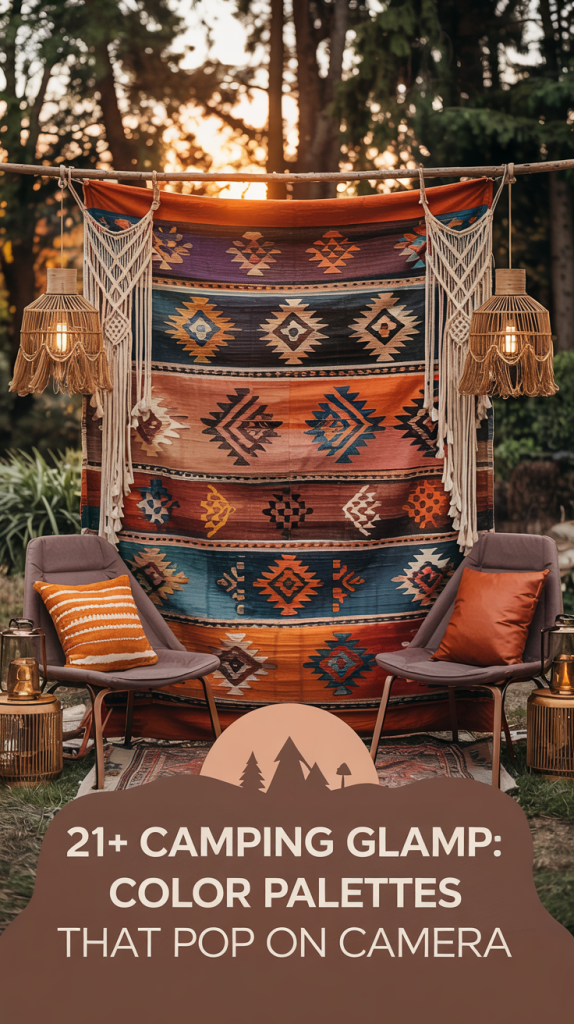
Using Macramé or Fringe-Trimmed Tapestries
Fringe adds texture that stops photos from looking flat. Hang a tapestry with fringe at the bottom edge so it frames the picture. Macramé details work too, they add depth and movement when the wind blows. A little texture tricks the camera into making the scene feel more three dimensional.
Tapestry Hammock Styling

Hammocks and tapestries go hand in hand, they both say “slow down.”
Wrapping Tapestries Around Rope Hammocks
Bare rope hammocks can dig into your skin, especially after a while. A simple fix:
-
Lay a soft tapestry over the hammock first.
-
Tuck the ends under the ropes so it doesn’t slide off.
-
If it’s breezy, clip the edges with clothespins.
-
Choose cotton for softness, polyester blends for durability.
Adding Pillows and Throws for Comfort
Pile on small pillows and a lightweight throw blanket. Not only does it make the hammock comfortable, it creates that styled boho look that shows up in Pinterest feeds. Keep patterns coordinated with the tapestry so it feels layered, not random.
Canopy for Hammock Corners
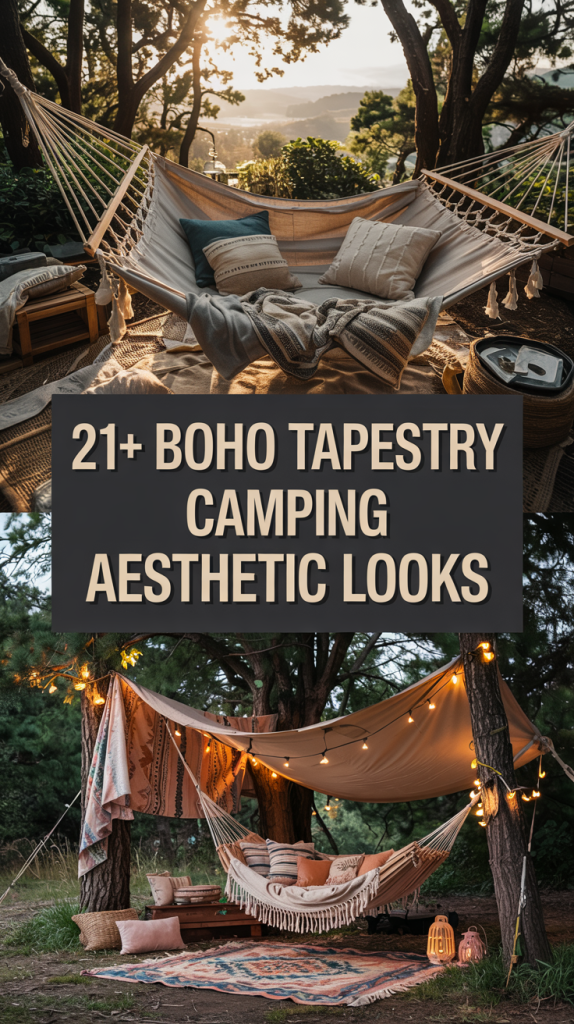
Want your hammock to feel like a little hideout? Add a tapestry above it as a canopy.
Hanging Tapestries Over Hammocks for Shade
-
Tie two corners of the tapestry to nearby trees or poles.
-
Let the other corners hang low to create angled shade.
-
Keep it wide enough so air still circulates.
It keeps the sun out of your eyes and the setup looks like a mini retreat.
Creating a Cozy Boho Cocoon
Add fairy lights along the inside edge of the canopy, or drape mosquito netting over the tapestry. Suddenly you’re not just lying in a hammock, you’re in your own private cocoon. At night, swap fairy lights for small solar lanterns for soft glow.
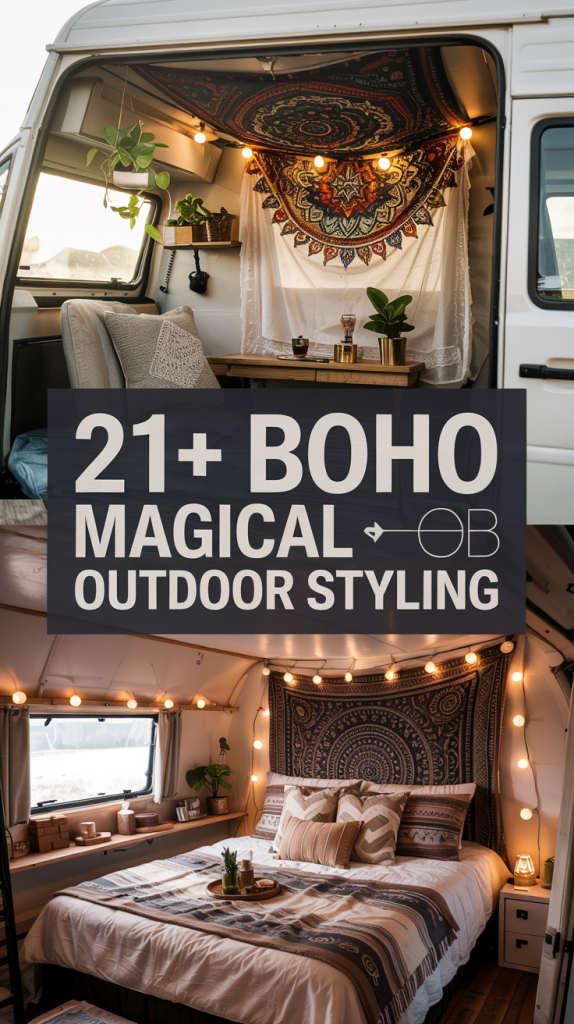
DIY Boho Headboards for Camper Beds

Your camper bed or sleeping bag corner doesn’t have to look plain. A tapestry can act like an instant headboard that makes the whole space feel intentional.
Hanging Tapestries Behind Sleeping Bags or Mattresses
-
Use removable hooks or adhesive strips along the wall or tent frame.
-
Clip the tapestry at the top so it drapes behind your bedding.
-
Let it fall all the way down if you want a full-wall look, or fold it halfway for a simple headboard.
-
For campers, tension rods between cabinets also work surprisingly well.
Even a neutral print creates a cozy backdrop, almost like bringing a piece of home decor into the outdoors.
Layering With Fairy Lights
Add a string of warm fairy lights across the top edge of the tapestry. The light glowing through the pattern gives off that dreamy Pinterest vibe at night. It’s practical too, low light for reading before bed without blasting your eyes.
Ceiling Drapes for Camper Vans
Camper vans can start to feel cramped fast, and that’s where ceiling tapestries help. They soften the look and make the van feel more styled than utilitarian.
Attaching Tapestries With Removable Hooks
-
Stick lightweight command hooks along the ceiling edges.
-
Clip the tapestry across them in a loose drape.
-
For a more secure option, staple the fabric to thin wood strips, then attach the strips with Velcro so they’re easy to remove.
Don’t glue anything directly to van walls—you’ll regret it later when you need to clean or resell.
Choosing Light Colors to Brighten Small Spaces
-
Pale neutrals like cream, sand, or light gray reflect light and make the van feel bigger.
-
Avoid heavy dark tones unless you want a cozy cave effect.
-
Mandala designs in pastel shades keep it boho but not overwhelming.
Vanlifers often share ceiling styling hacks on forums like Van Clan and and tapestries are one of the most common because they’re cheap, flexible, and removable.
Create Boho Room Dividers in Large Tents
Big tents sometimes feel like one giant room, and that can be chaotic if you’re camping with friends. Tapestries solve that problem fast.
Sectioning Sleeping and Lounge Areas
-
String a line across the middle of the tent and hang the tapestry like a curtain.
-
This instantly separates sleeping bags from the hangout zone.
-
You can even layer two fabrics for privacy without making the tent feel dark.
It’s especially helpful if you’re camping with kids, or you just want a private nook to read in.
Adding Fringe and Beads for Texture
Plain dividers do the job, but adding fringe, macramé, or beaded trim makes them feel decorative, not just functional.
-
Sew or clip fringe along the bottom edge.
-
Drape bead strings across the top like a curtain valance.
-
Go thrift-hunting for old scarves or fabric strips to tie in.
DIYers at Instructables have shared lots of easy fringe and bead projects, and many can be added to tapestries with basic hand stitching.
Outdoor Chill Zones Under Trees

Got a shady cluster of trees nearby? That’s free structure for a tapestry setup.
Using Tapestries as Shade Canopies
-
Tie corners to tree trunks or branches to create overhead shade.
-
Angle the fabric so one side hangs lower, making it more like a tent.
-
Pick darker colors for more shade, lighter tones if you want light to filter through.
Styling With String Lights and Lanterns
-
Hang fairy lights across the tapestry edge to outline the canopy.
-
Add solar lanterns that charge during the day, no need for cords.
-
Keep lights low wattage for ambiance instead of glare.
When the sun drops, that same shady grove transforms into a glowing nighttime lounge.
Cozy Camper Porch Vibes
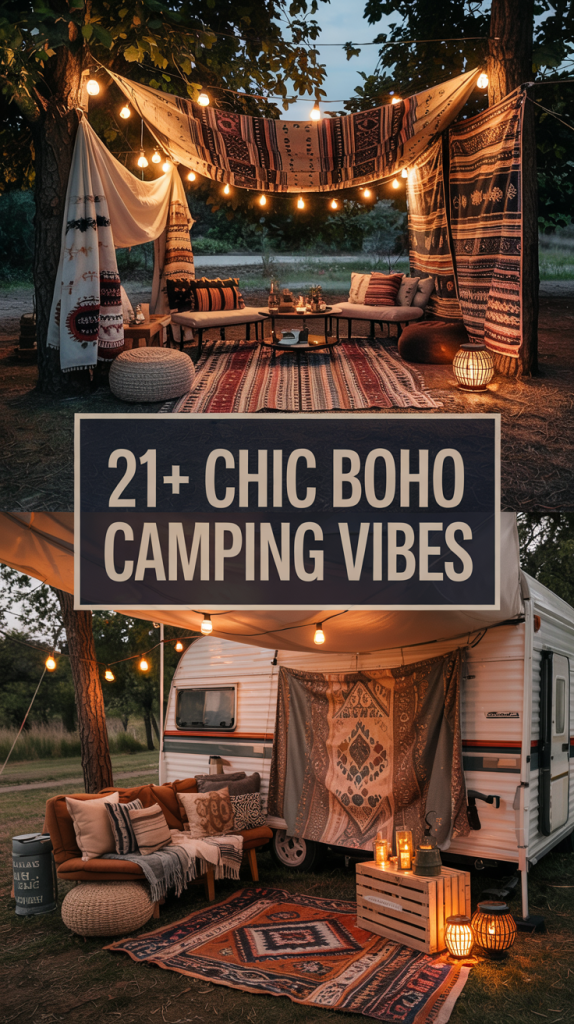
The little awning space in front of a camper is often overlooked. But drape a tapestry, and suddenly it’s another room.
Hanging Tapestries on Camper Awnings
-
Clip or tie fabric along the side or front of the awning.
-
Let it hang halfway down for privacy, or all the way for a curtain effect.
-
Use prints that contrast with your camper color so it stands out.
Styling With Floor Pillows and Rugs
-
Layer rugs underfoot to define the “porch” zone.
-
Scatter poufs, beanbags, or low chairs.
-
Add a crate table topped with candles or a lantern.
Now instead of a pass-through, you’ve got an outdoor living room.
Statement Walls for Boho Campsites
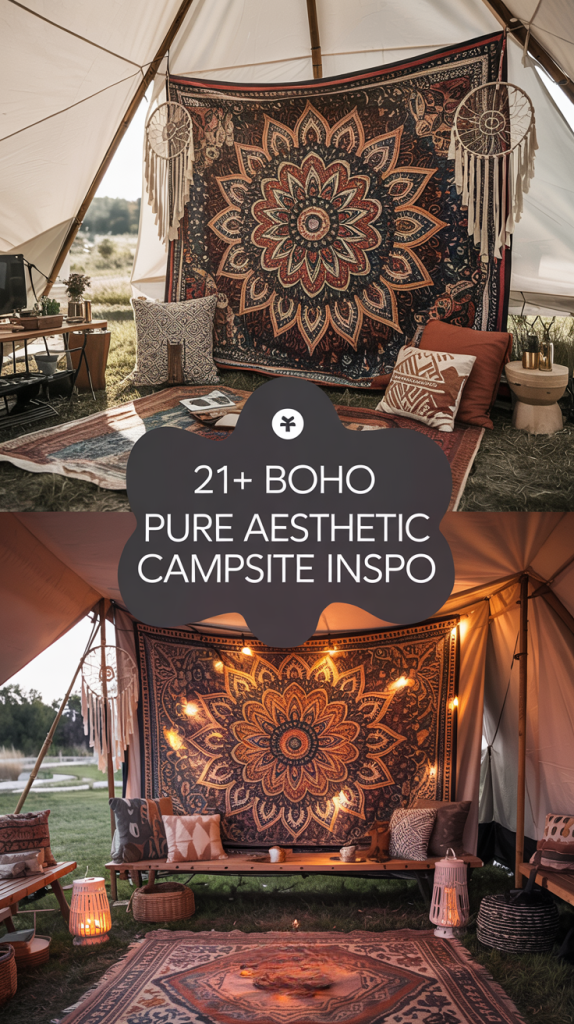
Sometimes all it takes is one big tapestry to set the tone for the whole campsite.
Pairing With Macramé and Dreamcatchers
-
Hang a large tapestry against your tent or camper wall.
-
Layer macramé hangings, dreamcatchers, or even feather garlands over it.
-
Mix textures so the wall feels collected, not flat.
Choosing Bold Mandala or Tribal Patterns
-
Mandalas are classic because they center the eye.
-
Tribal or geometric prints give off a nomadic feel.
-
If your site is surrounded by trees, bright colors stand out more.
A statement wall also doubles as the perfect backdrop for group photos.
Nighttime Magic With Lit-Up Tapestries

When the sun sets, tapestries don’t have to fade into the background. With the right light, they become the star.
Backlighting With Fairy Lights
-
String lights behind the tapestry so the fabric glows.
-
Choose warm bulbs for cozy, cool bulbs for mystical.
-
Clip them so they’re evenly spaced, gaps can look messy.
Projecting Patterns Onto Tapestries for Ambience
-
Use a small portable projector aimed at the fabric.
-
Play slow moving visuals, like stars, waves, or mandalas.
-
This works best with plain or light-colored tapestries so the projection shows clearly.
It’s a simple hack that makes your campsite feel like a movie set.
Tapestries as Festival-Style Flags
If you’ve ever walked through a festival campground, you know how colorful it feels. Turning old or thrifted tapestries into flags gives your campsite the same energy.
Cutting or Folding Into Pennants
-
Don’t be scared to cut inexpensive or secondhand tapestries into triangles or strips.
-
Hem the edges if you can, but honestly, raw edges fray a little and add to the vibe.
-
Fold fabric over rope and stitch, glue, or clip it down.
Hanging Along Guy Lines or Tent Poles
-
Clip pennants along your tent guy lines so they flutter in the wind.
-
Hang strips from tall poles to act like banners.
-
Use twine or paracord so the look stays rustic, not shiny plastic.
Festival-goers often use flags to make their camp easy to spot in a crowd — same trick works in busy campgrounds.
Conclusion
Boho tapestries aren’t just decoration, they’re the key to transforming any campsite into a free-spirited retreat. One fabric can serve as a canopy, picnic rug, headboard, wall art, or divider. Layer a few, mix in cushions and lanterns, and you’ve got a campsite that feels more like a home.
Experiment with patterns, color palettes, and textures. Try a bold mandala on one trip, then switch to soft neutral tones on the next. The beauty is in how versatile they are, no two setups have to look the same.
Next time you pack for camping, throw in a tapestry or two. You’ll find they don’t just change the look of your space, they change the way you feel in it. That’s the magic of the boho camping aesthetic — simple, soulful, and endlessly inspiring.